homage style

when your home is your canvas

schedule a design consult
  • blog
  • services
    • styling & decorating
    • home staging
    • virtual home staging
  • featured
  • about
  • workshops
  • contact
  • subscribe

don’t forget to sign up

11 March 2018 by Andrea Leave a Comment

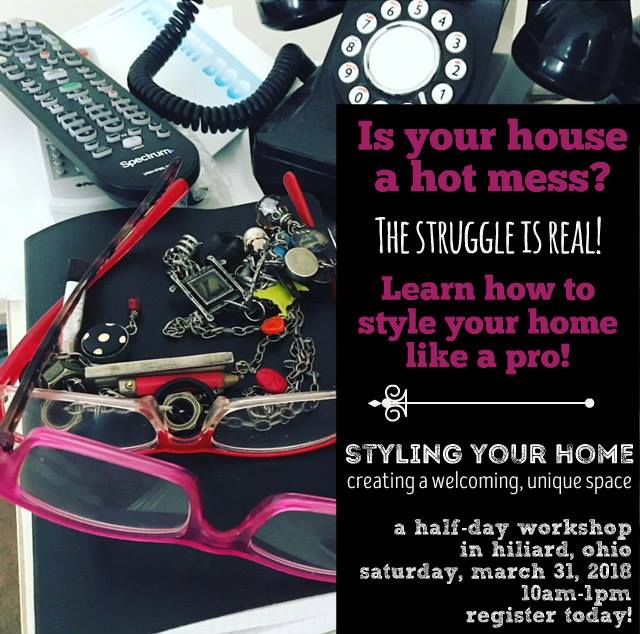
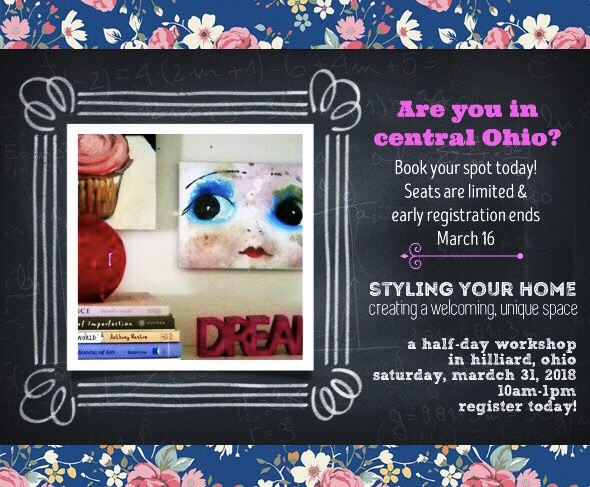
Sign up today for an exciting new workshop where you can learn how the pros create a beautiful and eclectic space while still looking classy!

If you’re struggling to pull together a unique look in your home and trying to stay on budget, then this is the workshop for you!

Learn more…

Seats are limited, so reserve your spot today!

is your house a hot mess?

5 March 2018 by Andrea Leave a Comment

Is your house a hot mess? Introducing an exciting new workshop where you can learn how the pros create a beautiful and eclectic space while still looking classy!

If you’re struggling to pull together a unique look in your home and trying to stay on budget, then this is the workshop for you!

Learn more…

Seats are limited, so reserve your spot today!

bachelor bathroom

8 March 2016 by Andrea Leave a Comment

Bachelor BathroomRecently a client purchased a new-build condo and reached out for my design help. The client, being a bachelor, wanted his place to have a very sleek, bachelor pad vibe, which I helped him accomplish, starting with his master bath.

The space has a shower and the option for a tub, but if you didn’t select the tub option, and my client didn’t, it left a large empty space, dying to be filled…

Bathroom BeforeThat space cried out for a large-scale art piece! But did I mention that my client was on a tight budget? Ah yes, the B word…

So I took matters into my own hands and painted a 36″ x 42″ geometric piece, speaking to the clean, mod vibe he was looking for.

PaintingFrom afar, all you can see is the geometry of it. But up closer, you can see the layers of color and texture, as well as a message…

Follow your heartAnd on the side of the painting, a secret part of the message, only for those who get close enough to touch it…

AlwaysThe painting is the focal point when you walk in the room, but when you face the vanity, you see this sharp collection of man-stuff, served up on a silver platter…

Bathroom counterOk, maybe not a silver platter…a hammered silvertone tray, from Target, for a mere $12.99. The two glorious vintage-look highball glasses, a steal at $1 each at Goodwill! The oil bottle, filled with colorful, minty-fresh mouthwash, is also from Target, for $4.99.

Bathroom counter frontA super sleek, yet affordable way to display your toiletries, and not have them just look like random man-stuff. This is, after all, a super-cool bachelor pad!

little things :: the hand edition

23 November 2015 by Andrea Leave a Comment

image1-768x1024b

Recently I had the opportunity to finish a little project that’s been curing for a while. If I’d known it would be so quick and easy I would have completed it ages ago!

I bought this awesome cast iron hand to hold jewelry in my bathroom from one of my favorite shops in Columbus, Elm and Iron (they have a shop in Cincinnati too)…

image4-768x1024a

And while the cast iron look is great, it was not the look I was going for in my bathroom. So I broke out some leftover champagne metallic spray paint and gave it a spritz.

After a mere two quick coats, it looks like this…

image5-1024x819a

Exactly the look I was going for.

So I hung it below my affirmation art…

image6-768x1024a

…and added a little gold paint pen to the screw heads so they didn’t stick out like a sore thumb. (Get it? Sore thumb?)

image8-1024x819a

Add jewelry and voila! A stylish piece with a practical application!


image1-768x1024a


image3-820x1024a


image7-768x1024a


Hands down, a super fun project!

(OK, I’ll stop with the puns now.)

the design studio is now open

7 September 2015 by Andrea Leave a Comment

pink doorThe Homage Style design studio is reopening…so come on in!

I will now be accepting local clients for home styling and decorating, as well as home staging. This is very exciting for me as I’ve been yearning to get back into a more creative life and I love helping people make their homes a beautiful and peaceful respite.

If you’re in the Columbus, Ohio area and want some design help, give me a call! I’m thrilled to have my design studio doors open again, so let’s add some style to your home!

Or, if your home is for sale or you’re planning to put it on the market, home staging will help you sell quickly and for top dollar! So give me a call!

If you’re not local, no worries, because I will also be doing virtual design consults, where we’ll work together over the phone to get your home styled up! Or if you’re selling your home, I’ll be doing virtual home staging for those outside the Columbus, Ohio area.

So whether your home needs a little sprucing up or you’re getting ready to unload the place, give me a buzz, and together we can work some magic!

Call Andrea at 6 1 4 . 2 8 2 . 5 1 4 1 today to set an appointment! I can’t wait to help make your dreams of home come alive!


searching for treasures

9 August 2015 by Andrea Leave a Comment

going junking with homagestyle.comOh yeah, baby. Going junking. Treasure hunting. Any funky decorator’s dream.

Ever since I’ve moved back to Ohio, I’ve wanted to go to the Lincoln Highway Buy-Way Yard Sale. It’s a yard sale that stretches from western Pennsylvania, goes through the tip of West Virginia, and shares it’s yard sale-ing goodness all across the Great State of Ohio!

Who wouldn’t want to go? And the real question is, why haven’t I gone yet? Who knows, but this year I’m in!

This Friday I’ll be traveling north from Columbus up to Mansfield, then turning left on Route 30 and seeing what the amazing state-wide yard sale has to offer.

I. Can’t. Wait.

And lucky you, because of course I’ll be documenting my trip and my treasures on Facebook and Instagram.

Wish me treasure-filled travels!

the tornado lounge

1 July 2015 by Andrea Leave a Comment

tornado lounge cover Living in central Ohio, there is an occasional tornado. And more frequently than actual tornadoes are tornado warnings.

Things get all conflabbergested when there’s a tornado warning (for those of you not living in the Midwest, this means that a funnel cloud has occurred or is imminent based on radar) – the tornado sirens go on and the TV meteorologists get all serious, trying not to look as excited as they are about the impending weather phenomenon, and people are advised to take shelter.

Where? In your basement if you have one.

Well we have one. It’s unfinished and inglorious. Not exactly a place where people are dying to spend time.

But since we do head down there at least on several occasions each spring and summer for the inevitable tornado warning, I wanted to put together a little something that I call the Tornado Lounge. A mod little place where we can cool our heels while the weather does its thing.

Introducing the Tornado Lounge…

tornado loungeIt’s got a lofty, industrial mod feel with the exposed rafters and the concrete floor and walls. Perfect for the occasional hangout in the basement. (And don’t mind the folding table off to the right of the pic…it *is* my basement after all.)

Just about everything is from Ikea – couch, coffee table, side table, TV stand, and orange chair. The orange chair is actually from Ikea by way of my local town’s Facebook buy/sell housewares page, where I picked it up lightly used for a mere $15! If you’re not already a member of your local Facebook buy/sell, I suggest you check it out.

The coffee table and TV stand are older products from Ikea and no longer available. Ditto for the couch cover. Needless to say, several aspects of this project spent some important curing time. I mean, why should this project be different than any other of my projects? It wasn’t until I asked my gentleman caller for help putting together the TV stand that I was finally able to finish this project.

tornado lounge closeupThe paper lanterns and light kits are from World Market. And the dehumidifier is, well, a necessity.

I figured that the hanging cable wire and lamp kit wires were no big deal in this setting and just add to the industrial feel of the space.

tornado lounge paper lanternNow let me give you fair warning in the event that you’ve never hung a paper lantern before…you need to get rid of your need for perfection, because these damn things will not hang perfectly straight. Trust me. I tried. And tried. And tried again. So get comfortable with imperfection folks.

Not too bad for a Tornado Lounge!

Now off you go to design your own Tornado Lounge…don’t get caught without one in bad weather!


getting started

23 March 2015 by Andrea 6 Comments

Kathleen front My first home

Your first place. Just those three small words evoke so many images for so many of us. A first apartment when you go out on your own. Or a hip bachelor pad. Or maybe the first home you bought with your new husband or wife. Or the first home you bought after your kids were born. Or the first place you lived after getting a divorce. Or maybe it’s just you and you finally screwed up the courage to realize that maybe it’s going to be just you for a while and it’s time to dive in and buy your own place.

No matter what your first place means to you, it’s a place of new beginnings. A fresh start. A place where you can express yourself and no one else gets a vote. Your home.

My first home was a wonderful place that I loved so very dearly. And still love it and miss it to this day.

38 Willowbrook Lane. There couldn’t be a sweeter sounding address.

And this home was close to perfect.

It seems like it was yesterday, but it was almost 17 years ago that this adorable little place was built. Hard to imagine how time flies and how much has changed since. My sweet little toddler daughter was a wild little three year old when we bought our first home.

Zoe at 38 WillowbrookMy daughter, then 3, exploring the house that would soon be home

Back then I was still married and we would drive by that cute little house every day as it was being built. Even though we drove by daily, I was so afraid to get my hopes up, fearing that somehow we wouldn’t get the house, wouldn’t qualify, or something would just fall through.

But we did get that house. And we moved there in 1997 and began to make it our own.

38 Willowbrook back yardThe fabulous little back yard at 38 Willowbrook

Before I lived in this house, I had no idea that I wanted to be an interior designer. Or even that I wanted to create. That lovely home nurtured in me something I never even knew existed. It made me realize the importance of creating beauty in the space in which we live.

Stained glass

Stained glass flowers that I painted

So I experimented there. Some experiments went better than others. Like the carnival-colored sheers in the family room – probably not my best work.

carnival

Carnival sheers…not so great!

But trying this and trying that led me to find my style and to nurture and grow it, leading me on a path of creativity that blossomed into a full-blown passion!

Family room

I grew into a classier design style in my first home

Not only did that first little home introduce me to my great love of decorating, but also to my love of whimsical decorative painting.

blueberries and fireflies

Blueberries and firefly evenings, painted on my kitchen wall

First with my daughter’s room as I decorated with flowers and gardens and whimsical fairies, but then when my son was born and we brought him home to this lovely little house, I painted his room with silly jungle animals, all painted in shades of blue. And let’s not forget their underwater bathroom, teeming will all manner of whimsical sea creatures!

undersea bathroom

The undersea bathroom…one of my favorite rooms ever

As the kids grew older, so did their rooms, and garden fairies and jungle animals were replaced by preteen girl funky stripes and a little boy’s cowboy room.

Pre-teen girl's room

My daughter’s room when she became a teenager

And before you know it, there came a time when we felt it was time to move on – to another state far away and soon to another life very different from the one we all shared in that quaint little house.

But it will live on fondly forever in our memories. Such is the power of your first place. A first home is the true meaning of getting started.

Twig over entertainment centerA birch branch from our old home hangs in our new home

another glorious chalkboard project

31 December 2014 by Andrea Leave a Comment

another glorious chalkboard projectRemember the 1990s?

I do, mostly because my kitchen table and chairs remind me of the 90s on a daily basis…

90s tableWith the table legs being a full-on tribute to the 90s…

90s table closeup
But the 90s table is all I have and nowhere in my mostly non-existent budget is there a line item for a new kitchen table, so I had to get creative.

You know how I love chalkboard paint, right? It’s already kind of a theme in my kitchen, since I painted my kitchen cabinets with chalkboard paint and did a section of the wall in chalkboard too. Why stop there?

I decided to paint my kitchen table in chalkboard paint.

Of course the peanut gallery (ie, my kids) thought it was a terrible idea. And of course I could care less about their opinion on such matters because I had a vision! So I set about painting it with chalkboard paint.

I started out with the legs and underside. I used an angled brush to get into the corners, nooks, and crannies, but mostly used a small foam roller designed for painting cabinets to get the smoothest application.

After just the first coat things were looking a little scary. Like maybe my kids were right and I had made a GIANT mistake…

First coat madness

  1. Chalkboard paint not looking like it’s going to cover or stick to the surface. (No I didn’t prime or sand…this is me we’re talking about!)
  2. Christmas tree not yet decorated, despite it being 3 weekends before Christmas. Yes, in fact, I was procrastinating on my decorating by painting my kitchen table. What of it?
  3. My son’s laundry. Just keeping it real, people.
  4. Dog photobombing my picture like it’s her job. And yes, she does have bows in her hair.

With regard to #1, what could I do, other than press onward. So I did…

First coats of paintI painted 5 coats on the legs and sides of the table. Not too bad – only took a couple of hours. Then I let it dry and flipped the table over to paint the top. The top got 6 coats. Sounds like a lot of time and effort, but since it was such a small area (not a complete wall or room), the actual painting time didn’t take long. And while each coat was drying, I just went on about my business. You know, avoiding decorating for Christmas and whatnot. I started the project at 2pm and put the last coat on around 11pm.

Here it is, beginning to come together and not looking so scary…

Beginning to come together

The most awesome finished product…Chalkboard table completeNot only does it look fabulous, but I’m thinking it looks a kind of Pottery Barn. All for the price of a can of chalkboard paint, which was about 10 bucks! Can’t beat that!

Plus the formerly 90s table legs got a new lease on life, with a line of chalk drawn in the inset…

Line of chalkI had thought about maybe doing gold leaf in the inset, but then realized that a chalk line would be the perfect casual addition to the table! Plus I can change the colors when I feel like it or erase it completely, depending on my mood.

Here’s my first scribbling on the new table…

Merry Christmas tableNow if you think that’s the end of the story, you clearly haven’t been reading here for too long.

It was only moments before I realized that with a 14-year-old and a 21-year-old, I probably made a very grave mistake in painting anything chalkboard. Let’s just say they added some “commentary” to my otherwise glorious chalkboard project…

Merry Christmas commentarySigh. And it only got worse from there. Most of it wouldn’t even be considered PG-13, so I won’t elaborate. But I’m sure you can use your imagination. At least the table looks great.

PROJECT UPDATE

And by project update, I mean project FAIL!

So this happened…

so this happenedIt started out with a couple of scratches in the paint, then a couple of areas that bubbled, followed by the kids and I having a paint peeling party one day at dinner.

Lesson learned: USE PRIMER!

So we continue to peel away portions. It’s far more rewarding than sanding. And I guess I will either a) leave it as it once it’s fully peeled, or b) eventually repaint, this time using a primer.

Why can’t anything ever be easy? Hahahaha! And that, my friends, is the true nature of DIY!

If you enjoyed this blog post, please share…


work in progress :: rose painting

4 October 2014 by Andrea 2 Comments

WIP rose paintingSo, I’ve had a project on my mind for a while, curing. It’s to take this pic that I received as a thank you…

Thank you rose

…and paint it on a large canvas.

Oh, you didn’t know that I could paint? Neither did I, until I took an oil painting class about 10 years ago. In fact, the teacher was visibly irritated with me because she thought that I had certainly painted before, which I had not. Which is weird, because shouldn’t one be happy to discover someone with talent? Well, whatever. She has since passed away, so I’ll not speak ill of the dead, lest they haunt me or something.

So anyway, I discovered that I can take a picture of something, like this orange rose, and paint it. If I’d been born in another place and time, I probably could have made a fortune as a forger, but with science and all, that’s just another dashed hope.

But I digress…back to my work in progress.

After caffeinating excessively in an attempt to inspire myself to do yardwork – a successful venture, I might add – I decided that it was high time to begin this painting project. I had already purchased a large canvas (36″ x 36″) several months ago in anticipation of curing for a while and eventually beginning this project.

First step was to add some picture hanging wire to the back. This time there were no injuries, like last time when I was contemplating a tetanus shot.

Next step was to do some sketching, which you can sort of see here…

Work in progress rose paintingThe painting will hang on my giant one and a half story stair wall, as you can see it hanging here as a work in progress…

Stair wallIt will have to hang there to dry as well, since a) I don’t have a big, giant easel, and b) I have a cat who will walk on my painting and ruin my life…

My cat who will walk on drying paintHopefully having a blank painting on a main wall in my house will inspire me to do more painting and less curing!

I will post updates throughout the painting process, so you can see my work in progress.


Next Page »
  • Email
  • Facebook
  • Instagram
  • Pinterest
  • Twitter

subscribe, baby!

Homage Style on Twitter
Homage Style on Facebook
Pin me! Homage Style on Pinterest

archives

WORK IN PROGRESS...

work in progress :: rose painting

FAVORITE PROJECTS...

the tornado lounge

another glorious chalkboard project

freshening up the family room

industrial chic curtains

angsty teen boy's room

almost instant art

vintage cowboy room

Copyright © 2025 · Beautiful Pro Theme on Genesis Framework · WordPress · Log in